8.23.2011

8.11.2011
Backpacks! With a Tutorial!

So we've been thinking a lot about school over here lately. Less than 2 weeks until Kindergarten, and preschool just a couple weeks after that. So of course, new backpacks are in order. I asked Breanne and Janey what kind of bags they'd like, and showed them a few different ones, and they chose messenger bags. And because I'm crazy, and found super cute fabric that the girls loved, we decided to make them.
 Cute, right? Perhaps minus the part where they're almost as big as the girls themselves, but I swear they're barely bigger than 10x12, to accommodate papers and binders and such. Maybe the messenger style wasn't a great idea for such small kids, but they love them, so we're keeping them.
Want to make your own? Because I was making two, I decided to just go ahead and take some pictures along the way, and I am now prepared to give my very first tutorial! I know this is nothing super exciting, and that there are plenty of messenger bag tutorials out there, but as a few people have told me--if I'm going to do tutorials, I have to start somewhere. So this is it. :)
Here we go.
For these bags, you need:
Main fabric, lining and batting EACH need:
3 pieces cut to 11"x14"**
2 pieces cut to 14"x3.5"
1 piece cut to 11"x3.5
1 piece cut to 4"x6" (if you want a pocket; you don't have to do the batting for this piece)
Whichever fabric you want your strap to be:
2 pieces cut to your strap length, mine varied by child. Janey's was around 12", Breanne's was 16" long, both 3.5" wide
Webbing:
1 piece cut to 12"
2 pieces cut to 4"
Melt the ends on all the webbing pieces so they won't fray.
1 package piping (optional)
and a clip thing to allow you to cinch up your straps, which should look like these:

**This allows you to create the flap with the lining on one side, the main fabric on the other. If you want the flap to be all one fabric, cut 4 pieces of that fabric, and 2 of the other.
Ok, so now that you have all your fabric cut out and in front of you, we'll start by making your pocket. I wanted piping on mine, so first I pinned my piping on and sewed it down (good tutorial for piping here),
 then put my other piece on top, right sides together, and sewed nearly all the way around them, leaving a hole to turn the pocket right-side out. Flip it right side out, and your pocket is pretty much done! You may want to topstitch the top of the pocket (right below the piping), but I didn't think to do this beforehand, so mine is not topstitched.
To figure out where I wanted my pocket, I placed it on my main fabric, and put a pencil on it to see where the pencil would hit. As long as it isn't too high, you should be fine.
 Now you can attach your pocket piece to one of your main fabric pieces by pinning it down, then topstitching around the three edges, and thus closing up your turning-gap.
 If you want to section the pocket off into individual pencil pockets, now would be the time to do that, too. I'm not certain my girls will be using the pocket for pencils, so I left that off for now. Also, if you want a closure on the bag (magnetic snap, velcro, whatever), this is also the time to figure out where you want it, and attach that to the body of the bag.
Next we're going to assemble the bag body. To do this, first you'll take your three side/edge pieces, and piece them together. They're the pieces that are 11" and 14" by 3.5". The 11" piece is going on the bottom of the bag, and thus should be in between the two longer pieces. You'll sew them together like this:
 Yeah, that's a long strip of fabric. :)
Now comes one of the trickiest parts of sewing the bag together--attaching the bag front and back to the sides. Don't worry, it's not hard, just try to get your pieces lined up right so your corners come out ok. To attach them together, you're going to lay down your main fabric, and then pin, right sides together, your long side strip, all the way around it. I recommend starting in the middle of the bottom piece, and working your way up to the top. It's not a big deal if the top doesn't end up perfectly even, as you can trim it. It is a big deal if there's a hole in the bottom of your bag because they don't match up. :) So when you're done pinning those pieces together, you should have something that looks roughly like this (minus the batting, that comes later but I didn't have a better picture of this step):
 Now you can sew along the edges, creating 1/2 the bag. When you come to the corners, sew until you're about 1/4 inch away from the edge, then put down your needle, pick up your presser foot, and turn the bag 90 degrees.
 Continue sewing, but make sure to keep all the extra fabric out from under the needle. The 3D-ness of the bag makes this just a little bit tricky, but it's not hard, just go slowly.
Do the same with the other piece of your main fabric--make sure your fabrics are all facing right sides together, and pin and sew along the edges. Yay, you now have a bag shape!
 Now is the time to add piping to the top of your bag if you want it. Same as with the pocket--just pin it on along the edge of the fabric, and sew as close to the cording as you can (I hear zipper feet make this way easier, but I only have my one foot... sigh. :)).
Next up, make the lining of your bag. This is pretty much the same as the above steps, minus the pocket (unless you want one inside, too--you can change this up however you want), and with batting added. My recommendation? Pin your batting like crazy. I made the mistake of not pinning one piece, and it was all sorts of wonky when I finished sewing it, even though it was a pretty basic piece to sew. So. Pin all your batting pieces to their corresponding lining piece, like this,
 making certain that you're pinning the batting to the *back* of the fabric (unpicking stuff sewn to batting is no fun, if you're wondering... ask me how I know). Then continue and sew the rest of the pieces together like you did the outside. Yay, you have another bag shape!
Next up, the flap. Take your last 11.5"x14" pieces of fabric and batting and stack them up, fabric right sides together, and batting on top. To round your corners out, find a plate or cd or something with the corner shape you're looking for, place it in the corner of your fabric, and either trace it or (if you're lazy like me), just cut around it.
 (Haha, Jess, I bet this is TOTALLY what you had in mind for me to do with this giant button... I do have other ideas, just haven't utilized it yet, and didn't have a plate or cd upstairs with me. :))
Again, I wanted piping around the edge, so pin that to the top piece of your fabric, and sew it on, same as before. If you're putting a closure on the bag, put that on the lining side of your fabric now, too. Then you can stack your pieces back up, and sew them together, being careful to sew as close to the piping as you can. Flip it right-side out, and you've got a flap.
 Good job!
The last piece to put together is your strap. For this, you take your 3.5" by whatever you decide strips, stack them up, fabrics right-sides together with the batting on top, and fold them in half. Put your webbing over the ends, and taper the fabric, like so:
 Just remember to give yourself a quarter of an inch on each side for your seam allowance.
Next up, put your clip-adjuster thingy on one of your 4 inch pieces of webbing, and sew the webbing closed around it, like so:
 Sew it on there good and tight.
Now you're ready to sew the strap together. Sandwich your strap with adjuster thingy in between your two pieces of fabric (right-sides together) on one side, and your other 4" strip of webbing on the other side, and place your batting on top, then pin it all together.
 Sew along your edges, leaving a gap on one of your long sides to turn it right-side out. Make sure to double back on your webbing pieces, to make sure they're plenty secure. When you're done sewing, you can reach inside and pull the webbing to pull it right-side out. Top stitch around the edges, and your strap is done!
 All that's left at this point is assembling and finishing the bag. Wahoo! Start with your lining bag, with the batting on the outside, fabric inside. Place your main fabric bag, right side out, inside your lining bag, like this:
 Then pin your strap in on the end that doesn't have the adjuster-thingy. On the opposite side, pin your 12" strap. Then pin your flap in on the side opposite your pocket, and you are ready to sew the bag together!
Start towards the middle of the side without the flap, and work your way (carefully! I broke a needle on this part because some of the seams were too thick for me to go as quickly as I wanted) around the bag, but be sure to leave yourself a good-sized gap to turn your bag through, like so:
 Now you can flip that baby right sides out, and push the lining back down inside the bag. Look at that! You've created a lined bag! You just need to pin the opening shut (and any areas you may have missed on accident during the last step, like I did here):
 and then you can topstitch the holes closed, and your bag is finished! Connect your 12" strap through your adjuster thingy, and you are good to go. And there you have it! You've made your own school bag. Who is excited for school?
 These two are! And they're one step closer to being ready.
  I think their little sister is excited, too. Alone time with mom, what could be better, really?
8.03.2011
Gauze Skirt
Man do I need better names for the stuff I make.
Anyway, a week or two ago, I (re)found this white eyelet gauze fabric I'd bought for round one of the flower girl dresses, which didn't end up making the cut. It's funny how sometimes I think a fabric will be perfect for one thing, then a while later, I see it again and come up with a totally new idea. As soon as I saw it that day, I knew it was destined to be a flowy skirt for Breanne. And thus it became.
Disclaimer on the photos. I just wanted a nice, sunny picture in our front room of Breanne wearing the dang skirt. Instead, I got about a million of these:

Thanks so much, barbie.com, for teaching Breanne and Janey the importance of "posing" in front of a camera.
And then these:


Where at least you can see the skirt. No luck on a picture of her happy face while wearing the skirt, but I guess I'll take what I can get. It's just a simple skirt, three slightly gathered layers, elastic waist, just a zigzag finish on the bottom to keep it from fraying, but not even a hem. I like the flow of it, without the hem to weigh it down. Has many imperfections, but I really do like the way it came out. And so does Breanne, which makes me happy.
Anyway, a week or two ago, I (re)found this white eyelet gauze fabric I'd bought for round one of the flower girl dresses, which didn't end up making the cut. It's funny how sometimes I think a fabric will be perfect for one thing, then a while later, I see it again and come up with a totally new idea. As soon as I saw it that day, I knew it was destined to be a flowy skirt for Breanne. And thus it became.
Disclaimer on the photos. I just wanted a nice, sunny picture in our front room of Breanne wearing the dang skirt. Instead, I got about a million of these:

Thanks so much, barbie.com, for teaching Breanne and Janey the importance of "posing" in front of a camera.
And then these:


Where at least you can see the skirt. No luck on a picture of her happy face while wearing the skirt, but I guess I'll take what I can get. It's just a simple skirt, three slightly gathered layers, elastic waist, just a zigzag finish on the bottom to keep it from fraying, but not even a hem. I like the flow of it, without the hem to weigh it down. Has many imperfections, but I really do like the way it came out. And so does Breanne, which makes me happy.
7.28.2011
Plaid Top
So school is rapidly approaching (Breanne and Janey will both be in school this fall, can you believe it?!?), and while I've bought the girls each a few things, I also have had some fabric hanging around waiting to be made into shirts. This is the first of what will be several, if I find the time.


I kind of love the way it came out, especially the bias casing in the middle. I made my own pattern to make it, but really, it was super simple all in all. I'm working my way up to a non-peasant-top neckline, and who knows, maybe even buttons with button holes will be next. We'll see. :)
P.S. Don't ask what skirt she's wearing with it, this girl definitely has her own ideas about style. The other day I was voicing a concern I have about her being made fun of because she wears homemade clothes. Then when I asked her to put on something to match her new shirt and she came back with this skirt (second try, even, the first was worse... haha), it hit me that maybe I don't have to be super concerned about what I make that she likes to wear... just how she puts them together. Funny girl.


I kind of love the way it came out, especially the bias casing in the middle. I made my own pattern to make it, but really, it was super simple all in all. I'm working my way up to a non-peasant-top neckline, and who knows, maybe even buttons with button holes will be next. We'll see. :)
P.S. Don't ask what skirt she's wearing with it, this girl definitely has her own ideas about style. The other day I was voicing a concern I have about her being made fun of because she wears homemade clothes. Then when I asked her to put on something to match her new shirt and she came back with this skirt (second try, even, the first was worse... haha), it hit me that maybe I don't have to be super concerned about what I make that she likes to wear... just how she puts them together. Funny girl.
7.20.2011


Cailin Defined

I could be wrong (doubt it), but I'm pretty sure this is pretty much the definition of adorable.
Just the girl, not all of her crazy antics lately.
7.18.2011
J&C's Room Stuffs
So since we got back from Utah, I've been on a bit of a sewing break. Just a little bit burned out. To try to get back into things, I decided to finally get something up on Janey and Cailin's window. I found these white sheers at Walmart for 3 bucks a piece (they're actually voile shower curtains, but they were WAY cheaper than anything in the curtains, and make pretty and sweet little curtains) a few months ago, but I knew I wanted to do something with some color too, to get a little bit more color on their walls. Enter Hancock's $4/yd upholstery fabric that I found the other day, and basically this tutorial, and you get this:


Yep, entire window coverings done for less than $15. I like it a lot, though I think I may cinch up the valance just a little bit more--does it seem too long to you?
Also, while I was taking pics of these, I realized I never showed off the little girls' name letters, which I finished a few months ago. Here are those as well:


Do you think I need an & in between the names? I'm leaning towards yes.
Maybe someday I'll take pics of the whole room, but I swear, their room always has some sort of mess going on. *sigh*
P.S. Thank you all so much for your kind comments on Breanne's hair. I ended up fixing up the back just a little bit more (it doesn't show in the picture I posted, but I needed to cut the hair underneath just a little bit--weird wavy hair stuff), but I really am pleased with how it came out, and Breanne loves it. And all of your kind comments about it. :) You guys make me happy.

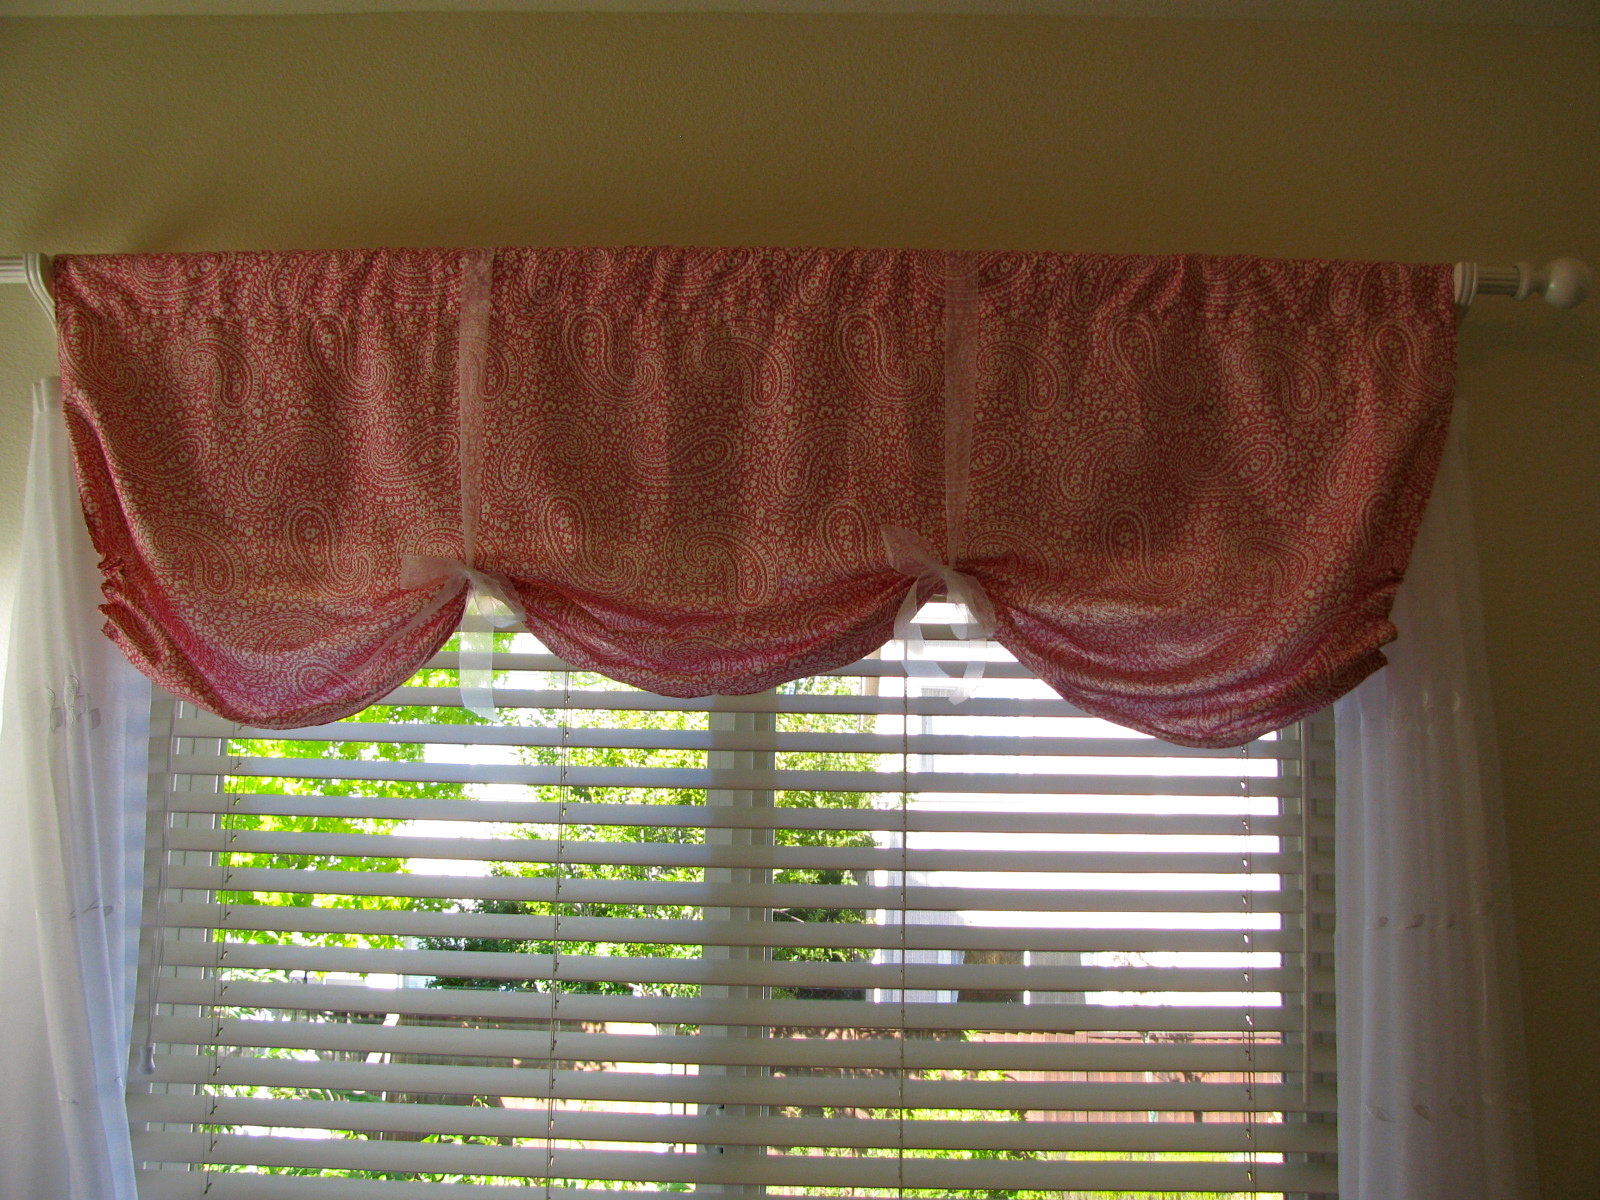

Yep, entire window coverings done for less than $15. I like it a lot, though I think I may cinch up the valance just a little bit more--does it seem too long to you?
Also, while I was taking pics of these, I realized I never showed off the little girls' name letters, which I finished a few months ago. Here are those as well:


Do you think I need an & in between the names? I'm leaning towards yes.
Maybe someday I'll take pics of the whole room, but I swear, their room always has some sort of mess going on. *sigh*
P.S. Thank you all so much for your kind comments on Breanne's hair. I ended up fixing up the back just a little bit more (it doesn't show in the picture I posted, but I needed to cut the hair underneath just a little bit--weird wavy hair stuff), but I really am pleased with how it came out, and Breanne loves it. And all of your kind comments about it. :) You guys make me happy.
7.15.2011
I Can Do It On My Own
So I've decided recently that part of the problem with being a DIY-er is that it makes me want to make/do everything on my own. I see something in the store, and think, "Hey, I could make that!" or see someone doing something, and think "Hey, I could do that!" Sometimes this works out for me, and sometimes the results are a little more questionable.
The last few weeks, Breanne's been asking me to cut her hair. I was hesitant at first, but then watched some tutorials, looked at some pics online, and today decided to just go for it. I think it went ok, what do you think?
Breanne's hair before:

And after--the back:

And the front!

And for the record, Breanne loves it. I think I need to learn more about cutting wavy hair--even though it's cut straight, in some places it doesn't really look like it, because of her natural waves. Where did I get these curly-haired kids?
The last few weeks, Breanne's been asking me to cut her hair. I was hesitant at first, but then watched some tutorials, looked at some pics online, and today decided to just go for it. I think it went ok, what do you think?
Breanne's hair before:

And after--the back:

And the front!

And for the record, Breanne loves it. I think I need to learn more about cutting wavy hair--even though it's cut straight, in some places it doesn't really look like it, because of her natural waves. Where did I get these curly-haired kids?
7.02.2011
4/5
4/5 of the dresses in a blurry picture that makes me look super happy (seriously, there are NO happy pictures of me during the wedding festivities... I had no idea I had an angry face all the time!)... but hey, you can see them in action! I'm so happy with how the dresses came out--I'll definitely be making more clothes in the future. But probably not yellow. Or circular. For at least a few days. :)

And in case you were wondering, I ended up hand-finishing the sleeves (while watching Arrested Development, excellent use of time, if you ask me), and I put embroidery-floss hand-crocheted belt loops on there to hold the sashes in place. Both worked out great, I'd say.
Would anyone be interested in tutorials of any of these things I'm making these days? I feel like I'm finally at a point where I might have something to show--lined zippers, fully lined dresses, hand-crocheted belt loops (felt hand puppets, whatever else I've made)... anything? I don't want to take the time to make a tutorial if it won't help anyone, but if you're interested, speak up please! I know everything I've learned has come from the internet/my own head and trial by error, so I'd be happy to share what I've figured out, if you want it. Let me know.

And in case you were wondering, I ended up hand-finishing the sleeves (while watching Arrested Development, excellent use of time, if you ask me), and I put embroidery-floss hand-crocheted belt loops on there to hold the sashes in place. Both worked out great, I'd say.
Would anyone be interested in tutorials of any of these things I'm making these days? I feel like I'm finally at a point where I might have something to show--lined zippers, fully lined dresses, hand-crocheted belt loops (felt hand puppets, whatever else I've made)... anything? I don't want to take the time to make a tutorial if it won't help anyone, but if you're interested, speak up please! I know everything I've learned has come from the internet/my own head and trial by error, so I'd be happy to share what I've figured out, if you want it. Let me know.
7.01.2011
Circle Quilt
So remember how I made 28 circle skirts for those flower girl dresses? (Yes, 28. 3 skirt layers, each lined, to make 6 circle skirts per dress, except for Cailin's, which was only 2 layers, so 4 circles, which totaled equals 28 circle skirts cut.) Well, for every one of those 28 skirts, there was a circle I cut out of the center to allow for the waists of the girls wearing them.

(As usual, I'm linking up to AmyLouWho's Sew and Tell... finally a quilting post to put up on her quilting blog!)
Well.
I couldn't just let 28, approximately 3.25 inch radius, perfectly good circles go to waste... so of course, I made a small circle quilt for the bride and groom. It's just a throw blanket size, but I love how it turned out.


(the back, pretty basic, but I like it, too)
I know, I know, it looks really girly, but these were their wedding colors. I just added a couple more fabrics with the pink in them to balance out the yellow. (Yes, that's pink in there, it was just raining outside when I finally took these pictures, all of an hour before we gave the quilt to the couple.) Also, this was the first time I've ever had a project professionally quilted--I seriously love the loops--what do you think?

(As usual, I'm linking up to AmyLouWho's Sew and Tell... finally a quilting post to put up on her quilting blog!)
Subscribe to:
Posts (Atom)